Blog Bilcyber.com - Part 3

40 plugins WordPress untuk mempercantik bagian komentar blog WP anda

40 WordPress Plugins To Improve Comment Section

One of the most important part of our blogs is the comment section.Especially if you own a huge blog with many visitors and commenters, the comment section design,the easy usage,the features,even the security is very important.I know there are some famous plugins which we use but i made a collection of some different plugins which maybe not known or less known.Here are the 40 plugins for comment section.I redirect the plugins to the original homepages so if you have problems you can ask the the author.The collection is made due to the average ratings of the users.

1.WP Grins Lite

WP Grins Lite will provide clickable smilies for both the post form in the admin interface and the comments form of your blog. WP Grins Lite uses the lighter footprint of the jQuery library.

wpgrinslite

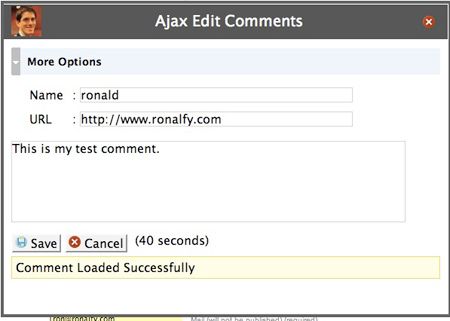
2.WP Ajax Edit Comments

The most powerful comment editing solution for WordPress. Users can edit their own comments for a limited time, while admins can edit all comments.

  • Can edit, de-link, move, mark for moderation, mark as spam, and delete a comment from a post.
  • Can edit in all comment panels in the WordPress admin panel.
  • Can de-spam, approve, moderate, and edit comments in the Akismet panel.
  • Various admin-panel options including

wpajax

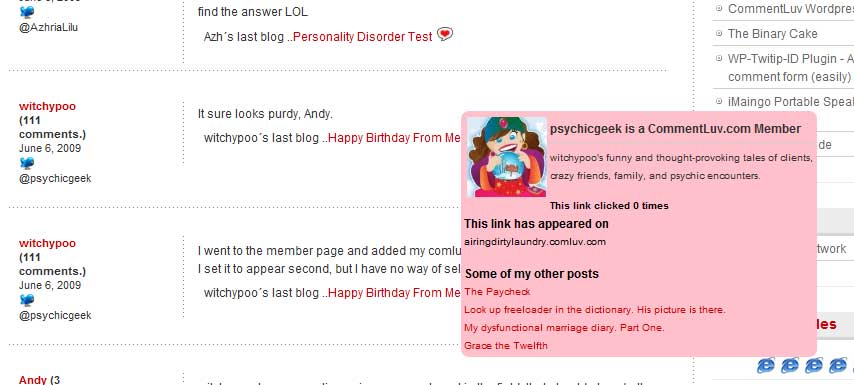
3.CommentLuv

This plugin will visit the site of the comment author while they type their comment and retrieve a selection of their last blog posts, tweets or digg submissions which they can choose one from to include at the bottom of their comment when they click submit.

It has been found to increase comments and the community spirit for the thousands of blogs that have installed it. With a simple install you will immediately start to find new and interesting blog posts, tweets and diggs from your own blog and community.
commentluv

4.Kaskus Emoticons

Kaskus Emoticons is emoticons used in kaskus forum. Kaskus it self is the largest Indonesian community that has millions members and posts. Some images here are copyrighted by Kaskus.

kaskus

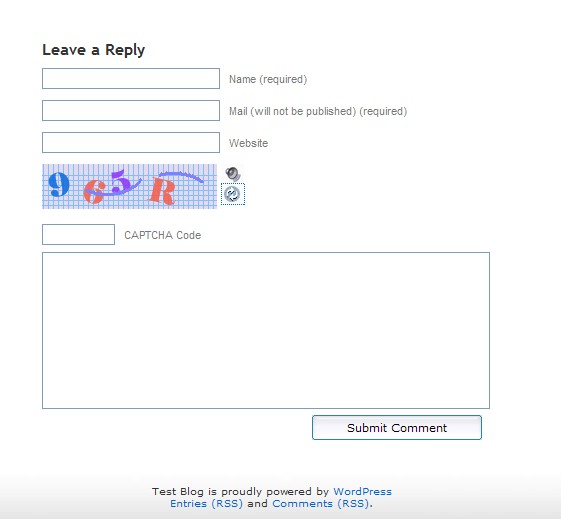
5.SI Captcha Anti Spam

Adds CAPTCHA anti-spam methods to WordPress on the comment form, registration form, login, or all. In order to post comments or register, users will have to type in the phrase shown on the image. This prevents spam from automated bots. Adds security. Works great with Akismet. Also is fully WPMU and BuddyPress compatible.
sı captcha1

6.Invisible Defender

This plugin protects registration, login and comment forms from spambots by adding two extra fields hidden by CSS.

7.yaCaptcha

yaCAPTCHA is a CAPTCHA plugin for WordPress that helps you block comment spam from automated bots. In order to post comments, users will have to write down the characters that are part of an image. Since it is relatively hard for automated programs to figure out those characters, this will help prevent comment spam from those programs.
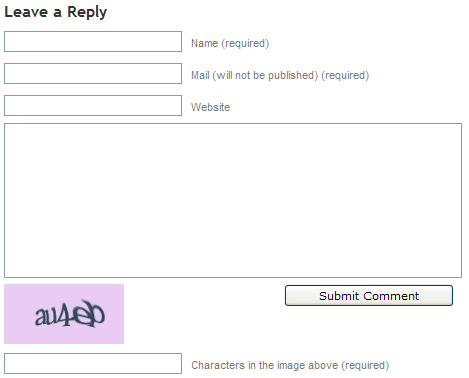
yacaptcha-comment-form

8.WP Comment Auto Responder

This plugin will send a automatic mail message when you visitor leave a comment on your wordpress blog.

Other feature of this plugin is when you or other visitor reply your visitor comment from your dashboard this plugin will make automatic message, and will tell to your visitor that their comment has replied.
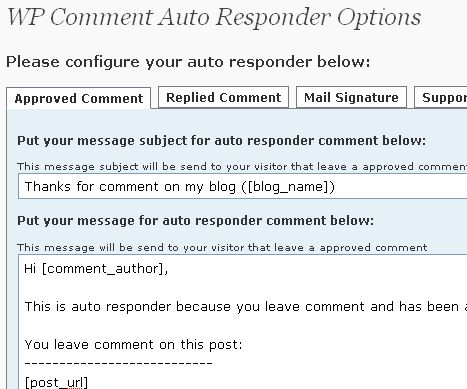
comment-auto-responder

9.GeoSmart

GeoSmart automatically adds city-precise location information for each comment author to comment metadata for each comment and a map showing comment author location distribution. GeoSmart also ships with a multiple instance capable sidebar widget that displays a map showing the locations of the most recent visitors to your blog.To display these maps you will need to obtain a Google Maps API Key
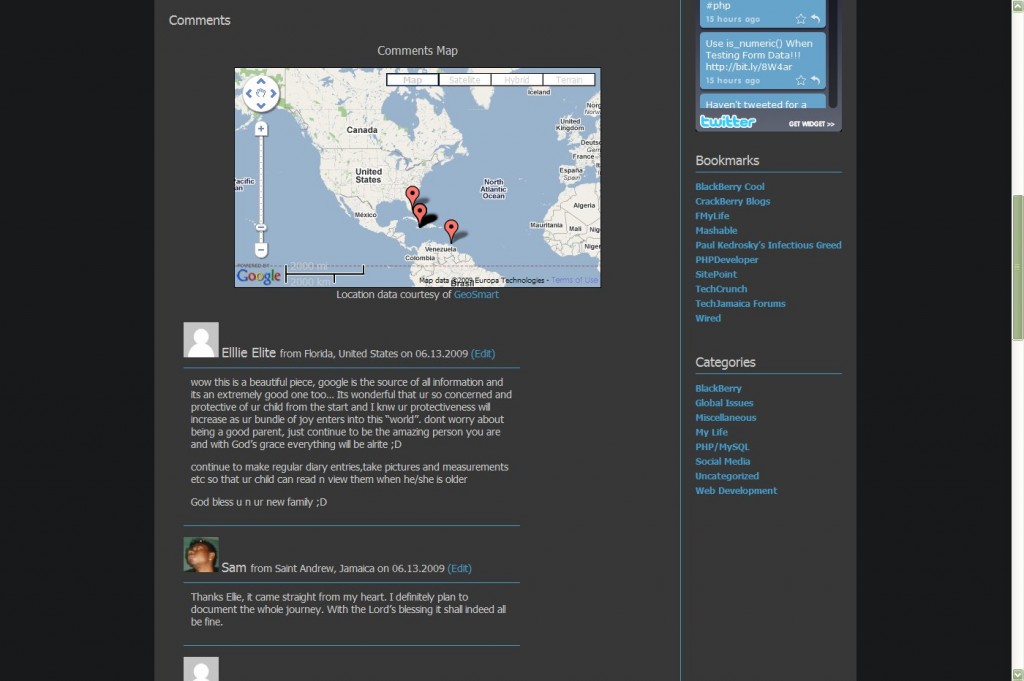
geosmart

10.Thank Me Later

Thank Me Later (TML) will automatically send an e-mail to your those who leave a comment at your blog. Use this plugin to say ‘Thanks’ to your visitors, and prompt them to further engage with your blog.

TML is highly configurable. It allows you to create multiple e-mail messages and to send the message after a pre-defined amount of time, making messages appear more unique and people-friendly.
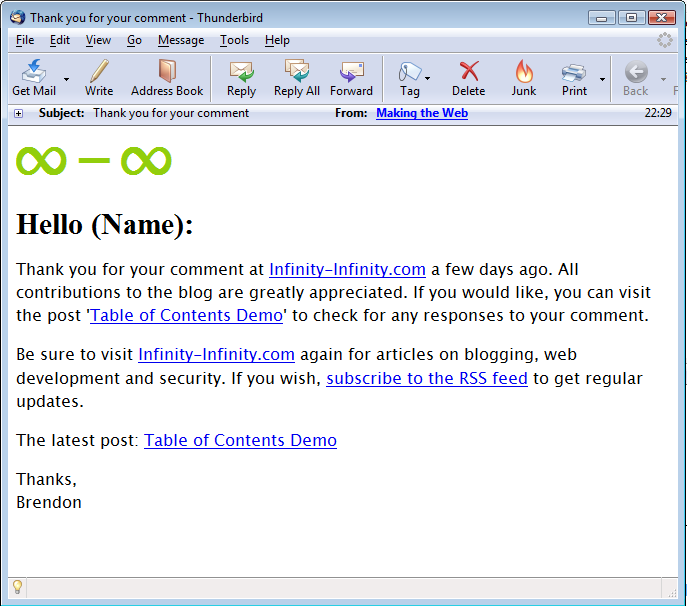
thankmelater

11.Kau-Boy’s Comment Notification

This plugin enables blog admins and editors to manage the notification of incomming comments. As WordPress only has the option to notify on every comment, the email account of the admin may recieve many email each day. Notification is also limited to the admin only, so only the admin user will recieve an email for incomming comments.

Using the plugin you can subscribe to a RSS feed that contains even comments that has to be moderated.

12.DISQUS Comment System

Disqus, pronounced “discuss”, is a service and tool for web comments and discussions. The Disqus comment system can be plugged into any website, blog, or application. Disqus makes commenting easier and more interactive, while connecting websites and commenters across a thriving discussion community.

ScreenHunter_01 Oct. 29 14.05

13.Commentwitter

Commentwitter is a WordPress plugin that gives commenters the option of Tweeting their comment with a link to your post.

Other features

  • Automatically creates bit.ly to specific comments in a post
  • Integrates nicely into forms
  • Blog owner can Tweet new comments automatically on their profile

commentwitter

14.Quote Comments

This plugin adds a tiny link that says “Quote” on each comment on your posts. Click it, and the contents of the comment is copied to the comment area, wrapped in blockquote tags.

15.Vertical Scroll Recent Comments

This will vertically scroll the recent comments in site side bar or any desired location with avatar or name or none.

Feature

  • It’s scrolling vertical so we can display more comments
  • User can see the newest comments at sidebar.
  • You can customize the number of recent comments to display.
  • It’s scrolling so it occupies less space in sidebar.
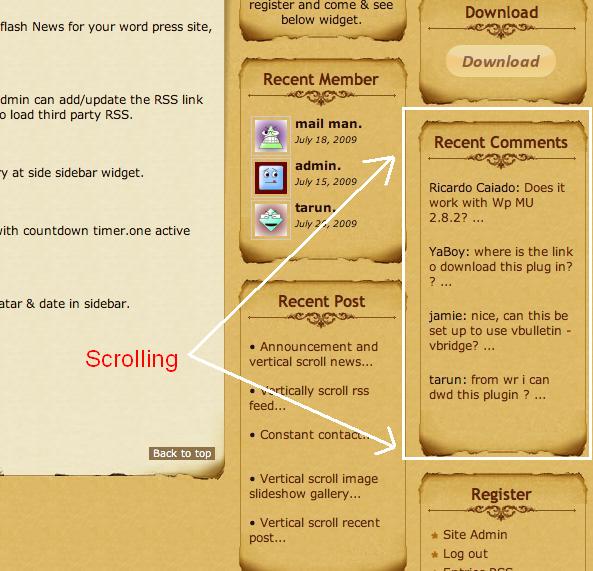
scrolling

16.Advanced User Agent Displayer

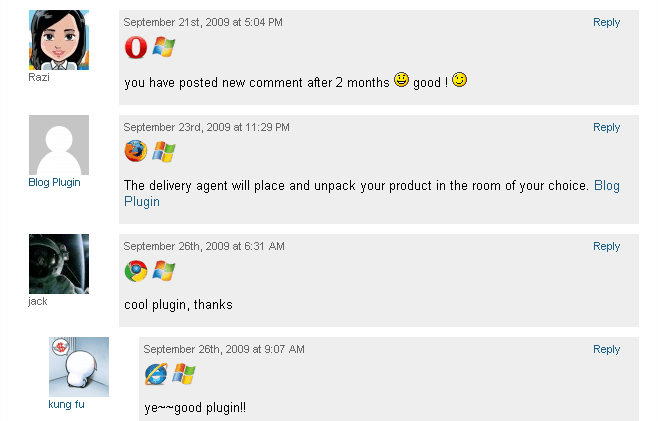
the Advanced User Agent Displayer plugin displays the Browser and the operating system of people who commnet on your blog. Currently Support for Desktop and moblie operationg systems and browsers. Browsers: Internet Explorer, Opera, Firefox, Safari, Chrome, Epiphany, Avant, Maxthon, Konqueror and … Platform: Windows(2000, XP, Vista, 7), Linux, Mac, iPhone.
ScreenHunter_02 Oct. 29 14.25

17.TinyMCEComments

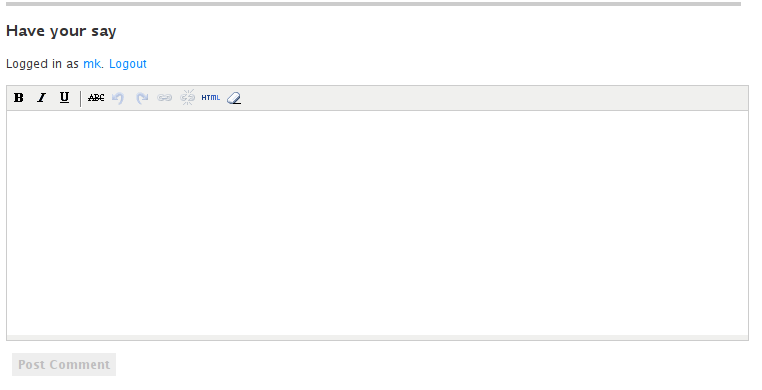
This plugin turns the comment field from a primitive <textfield> into a WYSIWYG editor, using the internal TinyMCE library.
tinymce

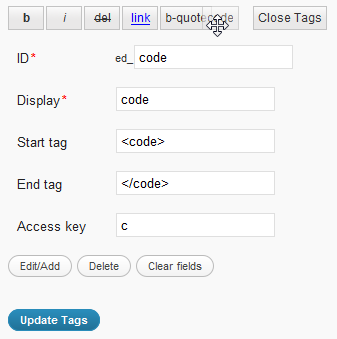
18.Comment Form Quicktags

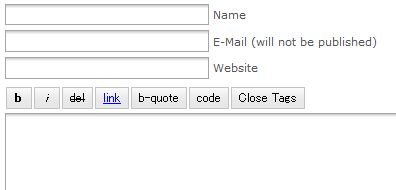
This plugin inserts quicktags of the admin page to the upper part of textarea of the comment form.

Features

  • You can edit tags in the admin page.
  • You can limit quicktags by user roles.
commentform1

commentform2

19.replyMail

WordPress version MUST up to 2.7+

Enhance the threaded comments system of WordPress 2.7+. When someone reply to your comment, send a email to you.

20.@ Reply

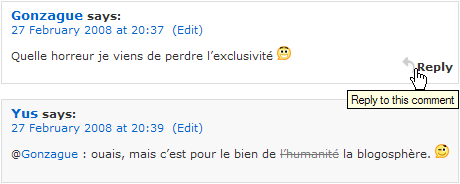
This plugin allows you to add Twitter-like @reply links to comments. When clicked, those links insert the author name and a link to the comment you are replying to in the textarea.
reply

21.Liz Comment Counter by Ozh

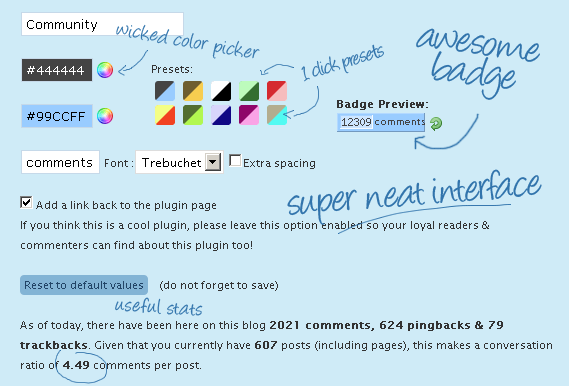
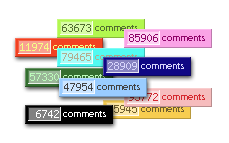
Liz Strauss Comment Counter is a highly configurable badge (very similar to the Feedburner one, except it’s more configurable) to show off the number of comments your blog has.
lcc-preview

counterbadge

22.Digress.it

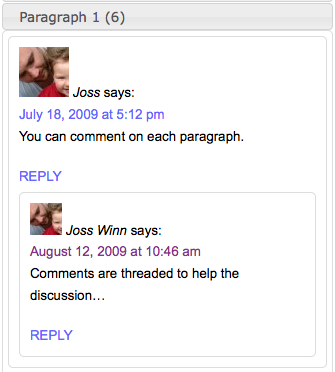
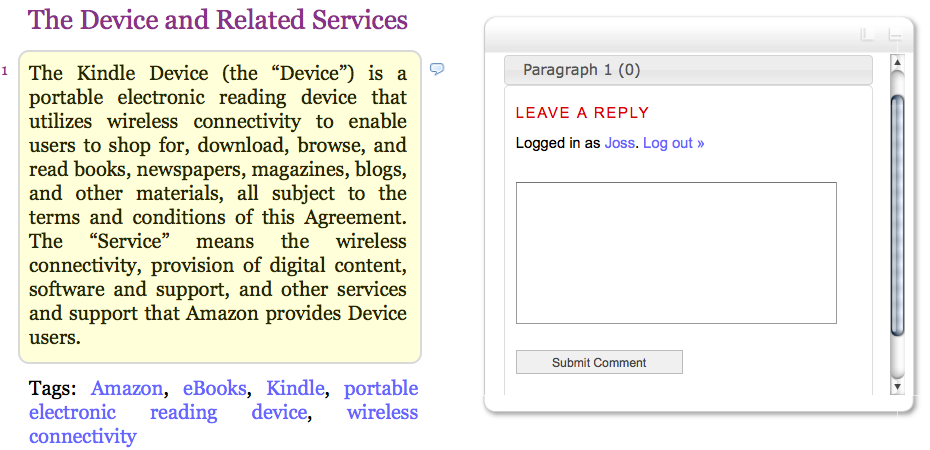
Digress.it lets you comment paragraph by paragraph in the margins of a text.Embed paragaphs YouTube-style on other sites.
diggresit

digress2

23.Greg’s Comment Length Limiter

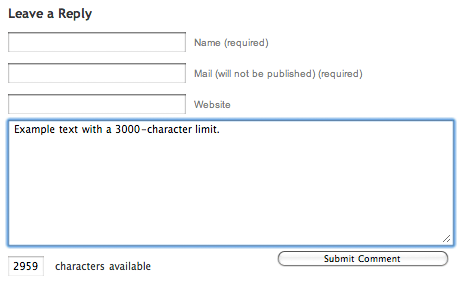
This plugin provides a configurable limit on the length of comments left in the comment form, with a character countdown displayed for the user and dynamically updated with each keypress.
commentlimiter

24.WDP AJAX Comments

This plugin will integrate AJAX commenting feature into your WordPress Blog. It uses the powerful JavaScript Framework jQuery to handle AJAX requests and jQuery Validation plugin by bassitance.de to validate comment form on the client side.

Feature Summary

  • Enable AJAX Commenting
  • Client Side Form Validation
  • Easily rolls back if JS disabled
  • Easily configure custom styles for messages

25.AVrAmTAR

AVrAmTAR.com is service which allows user to register and upload multiple avatars in their account. After that user will get his unique URL to the dynamic GIF image which will show different avatar (chosen from avatars user have uploaded) each time URL is accessed.

avmavatar

26.Wp-AuthorComment

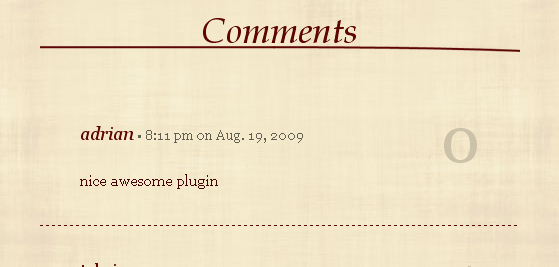
Allows you to uniquely style post author’s comments.
ScreenHunter_03 Oct. 29 15.17

27.Get Author’s Comments

This plugin allows to display or retrieve comments posted by a user. In order to avoid homonyms, a user is identified by his name and email(s).

28.Cookies for Comments

This plugin adds a stylesheet to your blog’s html source code. When a browser loads that stylesheet a cookie is dropped. If that user then leaves a comment the cookie is checked. If it doesn’t exist the comment is marked as spam.Copy into your plugins folder and activate. If you are using a caching plugin such as WP Super Cache make sure you clear the cache after enabling this plugin.

29.BackType Connect

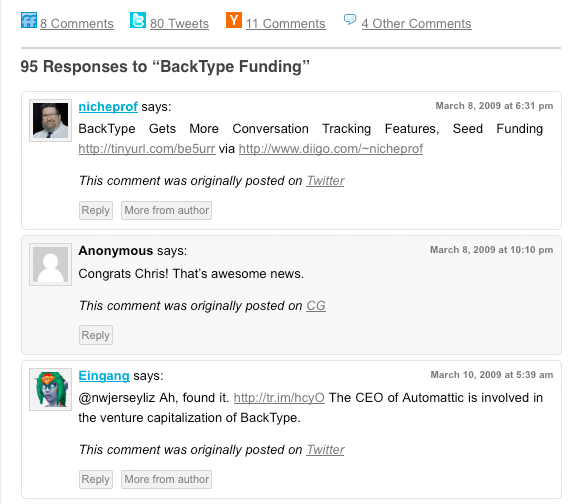
The BackType Connect WordPress plugin finds conversations related to your content and allows you to display the associated comments inline with your own. Existing conversations about your content taking place across the web can now be displayed right on your blog for your visitors to read and respond to. It works on top of your existing WordPress comments, both threaded and non-threaded.

  • Twitter – tweets that link your posts
  • FriendFeed – on the entries for your posts
  • Digg – on the submissions for your posts
  • Reddit – on the submissions for your posts
  • Hacker News – on the submissions for your posts
  • Other blogs – whenever someone links one of your posts
backtype

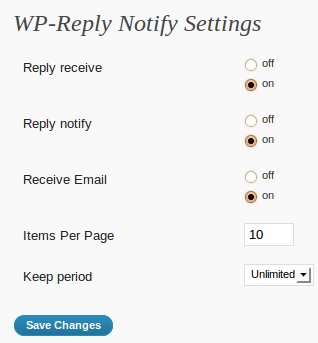
30.WP-Reply Notify

If you answer comments, you can get information through the blog address of comments. The other way, you can see information about comments other blogs send by admin e-mail.
wpreply4

31.GravatarGrid

Displays the Gravatars of all your commenters as a nice mosaic in the sidebar of your blog. The plugin is widget ready and comes with many configuration options!

Horizontal Position

gravatargrid2

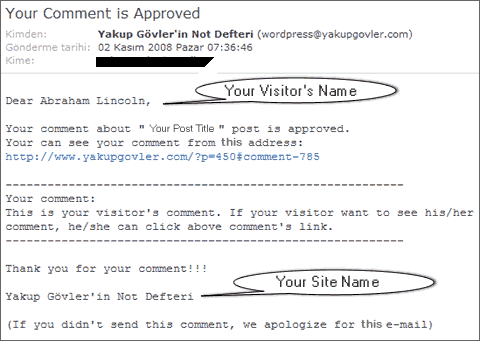
32.Comment Approved Notifier

Comment Approved Notifier sends an e-mail to your commenters when you approve their comments. It is a very simple plugin. There are no settings, options. It starts to work when you activate it.
commentapproved

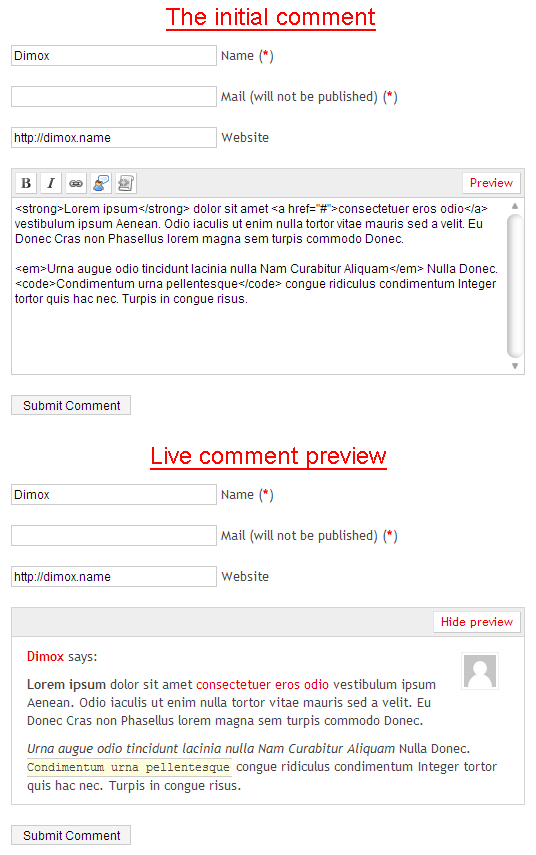
33.jQuery Comment Preview

Live comment preview without page reboot. Works on jQuery.

Attention: knowledge of CSS and HTML may require for using a plugin.

Requires WordPress version: 2.5 or higher.
commentpreview

34.Delink Comment Author

Delink Comment Author gives you the ability to remove the link a commenter left as their URL without removing the entire comment.

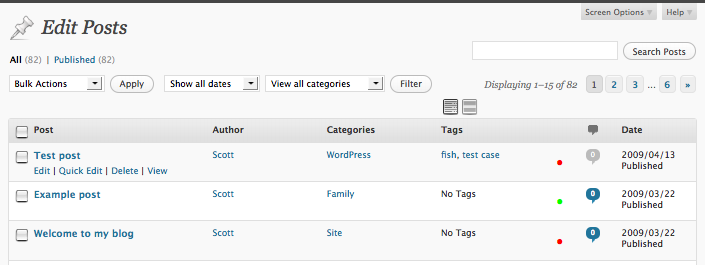
35.One Click Close Comments

Conveniently close or open comments for a post or page with one click.

From the admin listing of posts (‘Edit Posts’) and pages (‘Edit Pages’), a user can close or open comments to any posts to which they have sufficient privileges to make such changes (essentially admins and post authors for their own posts). This is done via an AJAX-powered color-coded indicator. The color-coding gives instant feedback on the current status of the post for comments: green means the post/page is open to comments, red means the post/page is closed to comments. Being AJAX-powered means that the change is submitted in the background without requiring a page reload.

This plugin will only function for administrative users in the admin who have JavaScript enabled.
commentclose

36.Comment Toolbar

This plug-in adds up to six buttons at the end (or the top) of every comments to automatically insert Comments Navigation, Reply and Quote functions. Then you can respond to the author of each comment and quote some or all of its comment. In addition, you can move easily between comments with smooth scrolling. Now you can customize the graphic appearance of button images.
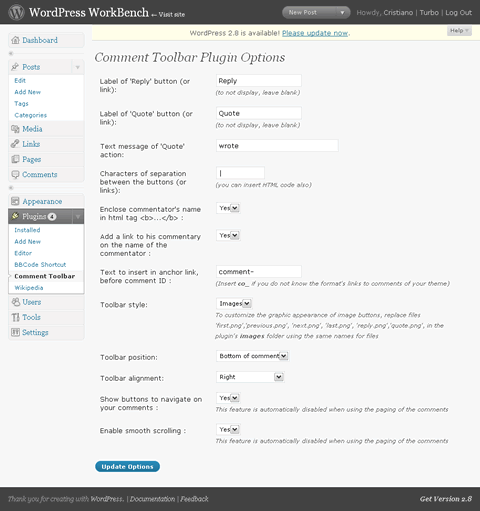
commenttoolbar1

37.Geo Captcha

Most spam most comes from certain countries. An effectiv method to avoid spam is to add a captcha to your commentbox, but it annoies your human users.

Geo Captcha uses the GEO-IP-library GeoLite Country by MaxMind (http://www.maxmind.com/) to get to know from which country the commentator comes from. If this country is not registered in the whitelist (can be edited in the admin interface) the commentator needs to enter a captcha, which is generated by SecurImage (http://www.phpcaptcha.org/)
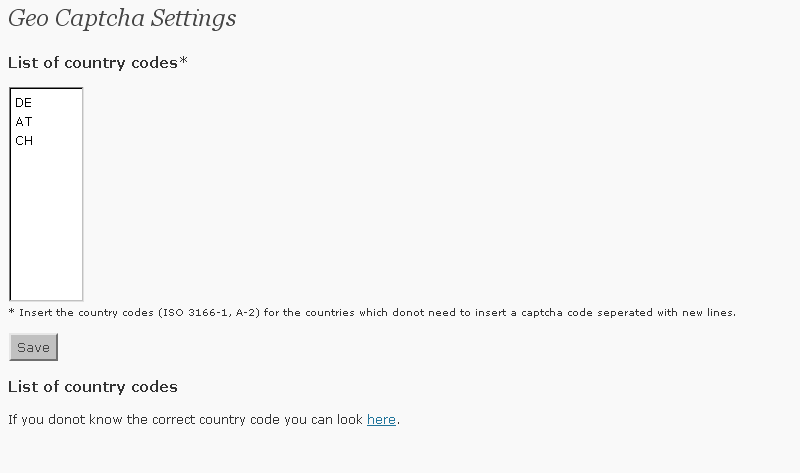
geocaptcha

38.Comment Validation

Did you ever see a message like ”please fill out required fields” or ”missing required fields”.This plugin aims to help by adding validation to the comment form. When a user submits the form and something is missing, an appropiate message is displayed and individual fields are highlighted. When the email or url is in an incorrect format, a message is displayed accordingly.
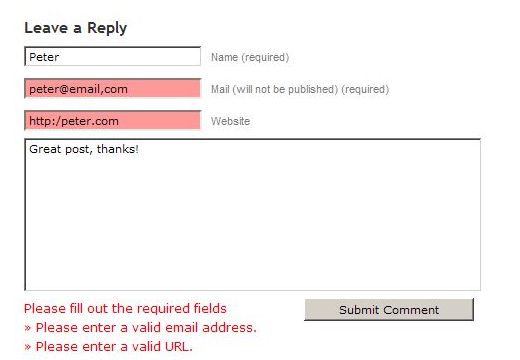
required fields2

39.Smilies Themer Toolbar

Smilies Themer Toolbar provides a toolbar to easily add custom smilies to comments.From v1.0, (WP>=2.5 only) it also integrates into tinyMCE, the rich text editor that you use when you write the posts.

It integrates with Smilies Themer plugin, and therefore requires it.

You can change your smilies theme in your blog, and the toolbar is automagically updated!

smileycomment

40.Minimum Comment Length

Some visitors only comment with just a smile and if this is annoying for you then you can use this plugin.Minimum Comment Lenght plugin as you understand from the name forces to comment for more than 15 characters.If people then leave a comment of less than 15 characters, WordPress dies on them with the message “Error: Your comment is too short. Please try to say something useful.”, or whatever other message you decided to give to them, as this is the second option you can specify in the backend.

Cara Membuat Random Banner pada Widget WordPress

Banner atau yang biasa kita kenal sebagai gambar pada sebuah site yang memiliki link di dalamnya, merupakan bagian pendukung dari sebuah blog. Tapi tidak baik juga juka kita memasang banyak banner yang tersusun di sepanjang widget atau post. Hal itu sangat memberatkan pengunjung maupun blogger, khususnya yang memiliki keterbatasan kecepatan akses internet.

Memang jika blog kita memiliki banyak banner sehingga memberatkan blog kita terpaksa menghilangkan banner-banner itu. Tapi kini ada solusinya, yaitu dengan menggunakan random banner. Jadi kita hanya mengeluarkan misalnya 12 banner, tetapi itu akan tertampil pada blog hanya 6 banner dan sisanya akan di tampilkan secara random jika kita merefresh ulang.

Itu akan menghemat pemakaian banner secara berlebihan. Jadi kita dapat memasang banyak banner tanpa takut kecepatan akses internet jadi lambat. Disini kita akan mempelajari cara penggunaan Plugin “Random / Rotating Ads” sebagai random banner. Berikut cara-caranya :

  1. Download Plugin “Random / Rotating Ads” disini dan extrak dengan menggunakan WinRAR yang bisa didownload disini
  2. Lalu buka file datafeedr-random-ads -> wp-content -> plugins.
  3. Buatlah directory bernama “ads” ke wp-content atau bisa upload directory bernama “ads ” ke wp-content.
  4. Upload file “datafeedr-ads.php ” ke wp-content/plugins.
  5. Aktivkan plugin nya.
  6. Sekarang buat file .txt :
    1. Buka Notepad dan namakan misalnya “ad_125x125.txt” lalu isi code html banner dan pisahkan dengan tanda | (Shift+Marco), contoh:

      <a href=”http://example.com” title=”example.com”>

      <img src=”http://thedery.co.cc/wp-content/themes/statement/images/banner/125×125.jpg” border=”0″ alt=”” width=”125″ height=”125″ />

      </a>

      |

      <a href=”http://example2.com” title=”example2.com”>

      <img src=”http://thedery.co.cc/wp-content/themes/statement/images/banner/125×125.jpg” border=”0″ alt=”” width=”125″ height=”125″ />

      </a>

    2. Ini berarti dalam 1 tempat banner terdapat 2 banner yang tertuju ke example.com dan example2.com
    3. lalu simpan “ad_125x125.txt” kedalam directory “ads” (wp-content/ads)
  7. Mungkin di bagian ini sedikit membingungkan karena harus mengedit sebagian theme yang dipakai, tetapi ada juga cara yang lebih mudah, berikut 2 caranya, saya sarankan pakai cara ke 2 karena lebih mudah :
    1. Cara 1 :
      1. Copy code berikut dan pastekan pada bagian theme yang ingin ditampilkan seperti pada sidebar.php atau yang lain. Misalnya copy paste di bagian sidebar.php :
        <?php if (function_exists(‘dfrad’)) { echo dfrad(‘ad_125x125‘); } ?>

        Keterangan warna merah :

        1. ad_125x125 : Nama banner .txt yang tadi sudah di buat
      2. Buka wp-content/themes/(*theme yang anda pakai)/sidebar.php dan pastekan di bagian yang ingin di tampilkan.
      3. Itu baru 1 tempat banner yang terdapat 2 banner, anda bisa menambahkannya 1, 2, 3 hingga banyak tempat banner sekaligus dengan mendoublekan code di atas.
    2. Cara 2 :
      1. Buka bagian Widget Blog.
      2. Lalu Add Random Ads nya.
      3. Klik Edit dan tulis nama file .txt nya. seperti contoh yang tadi “ad_125x125” tulis tanpa .txt
      4. Klik Done dan klik Save Changes.
  8. Setelah itu buka blog anda dan refreslah berulang ulang, banner akan di muncul secara random.

Jika masih belum mengerti pulang saja bisa lihat video dari sini.

Tips SEO On Page WordPress

SEO On Page WordPress adalah optimasi yang dilakukan pada web atau blog dari isi halaman blog agar mempunyai pengaruh baik dalam keberadaan blog itu sendiri. Hal ini dilakukan untuk memaksimalkan blog biar cepat dan selalu terindeks google. Kalau web atau blog sering terindek mesin cari seperti Google misalnya akan menjadi nilai positif untuk kelangsungan web atau blog tersebut. Untuk lebih jelasnya baca ulasan berikut.

Pengertian Dan Pendahuluan

* Kenapa WordPress = jawabannya adalah WordPress adalah Blog Cms yang paling sederhana, Powerfull, SEO friendly, Banyak Pluginnya, dan tentunya relatif aman karena selalu terupdate.
* Apa itu SEO = SEO singatan dari search engine optimization, intinya SEO itu memunculkan blog kita di halaman 1 google dengan keyword bidikan kita
* Apa Itu SEO whitehat = SEO yang tidak melanggar TOS google, Biasanya lambat tapi aman. sedangkan SEO blackhat itu biasanya cepet, melanggar TOS google dan rawan di banned

Modal apa Saja Buat Menjadikan WOrdpress Blog Kita SEO friendly?

* Hosting + domain, Gratisan boleh cuma tidak optimal
* Instalasi Wordprees
* Plugin AA Search engine verify = untuk verifikasi google webmaster tools dan myyahoo
* Google sitemap Generator with google translate support = untuk membuat sitemap otomatis
* Plugin All In One SEO Pack = SEO lengkap dari meta tag, title, keyword
* Plugin SEOimage = menjadikan images di blog kita SEO friendly dengan menambahkan keyword dan tag
* Plugin STT dan STT2 untuk menyimpan hasil query dari google, jadi kalau ada pengunjung datang ke blog kita karena keyword tertentu maka keyword itu akan di log di blog kita dan bisa dijadikan tag secara otomatis
* Plugin onlywire = untuk otomatis sent posting ke 30 social bookmarking
* Plugin Post Rating, Plugin Recent Post, Plugin feedBurner
* Tempalte yang sederhana tetapi menarik (kalo bisa sidebar di kanan)
* Plugin Global Translator = Buat Translate Blog Kita ke 41 bahasa dan bisa di Include ke sitemap, plugin ini mempunyai SEO bagus karena akan membuat url otomatis hasil translate (chaced), bisa juga di gabung dengan Plugin google xml sitemap support google translate untuk menambahkan ke sitemap.

Langkah-langkah Persiapan WordPress

* Install WP Sepeti Biasanya, bisa manual atau fantastico
* Install semua plugin diatas = caranya login ke admin area —->Plugins—>add New—>ketik nama plugins—>search—>ketemu, dan Install
* Configure Plugin2 diatas
* Install Theme yang simple tapi menarik, gratisan bisa diperoleh dengan —>themes—->add new theme—>search sesuai keinginan—->install
* masuk ke setting—>trus pilih privacy—>trus pilih option yang diatas, buat confirm bahwa kita megijinkan blog kita di index google
* masuk Ke Setting—->permalink—>pilih custom permalink
Custom permalink diisi dengan
Code:

/%postname%/

ini betujuan untuk membuat url posting dan halaman blog mudah diingat dan mengandung keyword dari postnamenya

Setting All In One SEO Pack

* Masuk Setting—>all In One SEO pack—>Trus Enable
nah pada tittle diisi dengan : keyword1 | keiword2 | Keyword3 | Keyword4
Pada Description : Keyword1 description, Keyword2 description, Keyword3 description
* keyword diisi dengan keyword seperti biasanya

Advanced Setting
Untuk pemula yang kurang tau HTML atau PHP langkah diatas suda cukup bagus untuk OFFPAGE SEO, tapi bagi yang bisa sedikit2 ngerti HTML bisa dipraktekkan sedikit langkah ampuh

nah disini akan dijelaskan membuat tag <h1>judul posting</h1> secara otomatis, kenapa? karena google akan lebih memperhatikan huruf atau kalimat dalam tag h1 h2
caranya :

dengan Mengedit template kita, pertama buka —> appearance—> editor—> klik pada Index.php dan Home.php untuk halaman depan dan singlepost.php untuk halaman post

langsung aja cari :

<?php if (have_posts()) : while (have_posts()) : the_post(); ?>

nah dirubah jadi :

<?php if (have_posts()) : while (have_posts()) : the_post(); ?>
<?php if (get_post_meta($post->ID, h1-keyword)) { ?>
<h1 style=”display:none;”><?php echo get_post_meta($post->ID, h1-keyword, true); ?></h1>
<?php }; ?>
<?php if (get_post_meta($post->ID, h2-keyword)) { ?>
<h2 style=”display:none;”><?php echo get_post_meta($post->ID, h2-keyword, true); ?></h1>
<?php }; ?>

Nah Untuk memanggilnya pertama pada saat posting add new custom field :
Name: h1-keyword
Value: keyword yang mau dijadikan h1, misal webhosting
Name: h2-keyword
Value: keyword yang mau dijadikan h2, misal dedicated webhosting

Nanti hasilnya di setiap postingan kita, akan ada tambahan kode seperti ini

<h1 style=”display:none;”>webhosting</h1><h2 style=”display:none;”>dedicated webhosting</h2>

Cuma Robot google yang bisa lihat, sedangkan pengunjung tidak bisa.

Tips Cara Mempercantik Blog WordPress

logo-wordpressBerawal dari euforia temen2 elins dalam membuat blog. Kemaren temen saya sebut saja Azwar -nama sebenarnya- googling untuk mengetahui cara “mempercantik wordpress”. Mungkin yang dia maksud adalah cara mempercantik blog yang menggunakan wordpress. :)

Namun jangan salah biarpun masih awam banget dunia blog. Dia sudah cukup mahir untuk membuat berbagai robot dan bahkan mengalahkan saya dalam main warcraft. :( Kemudian terbetiklah hasrat saya yang gak mau kalah ini,untuk membuat sedikit tips cara mempercantik blog tampilan wordpress. :) *itung2 biar kalah di warcraft tapi gak mau kalah di bidang yang satu ini.hhaha ampun war.. :D

Oke nih sedikit tips dan trick tentang cara mempercantik tampilan blog wordpress anda. ;)

1. Pilih theme atau template yang sesuai dengan isi blog anda.

Pilih theme atau template yang sesuai dengan isi blog anda. Misal blog anda untuk catatan pribadi, curhat,berbagi info bisa dengan memilih theme yang menonjolkan tulisan. Bila untuk blog bisnis bisa memilih yang menyediakan banyak space iklan. Tapi jangan lupakan isi content juga harus terlihat. ;)

Untuk mengganti theme anda masuk ke account wordpress anda->appearance->theme. Klik disini untuk memilih theme wordpress.

2. Tambahkan plugin

Bila anda ingin mempercantik tampilan blog anda bisa dengan menambahkan plugin. Sesuaikan dengan kebutuhan dan tampilan. Contohnya anda ingin menggunakan “bola” tags dan categories,gunakan wp-cumullus. Atau ingin menambahkan tab pages sendiri gunakan dTabs.

Untuk menambah atau memilih plugin anda bisa klik Plugins->add new. Setelah itu tinggal di installl dan diedit. Klik disini untuk memilih plugin wordpress.

3. Tambahkan widget

Di appearance anda akan menemukan pilihan widget dibawahnya. Nah disana anda bisa menggunakannnya untuk memasukan backlink blog anda. Menambahkan status yahoo messenger di blog anda. Atau box chat juga oke. Jika anda ingin menambahkan widget disidebar tinggal klik widget yang anda inginkan. Jika tidak ada pilihannya disitu pilih text->add dan masukkan kode html di situ.

4. Percantik tampilan blog anda dengan gambar.

Anda bisa memasukkan gambar saat posting. Atau menaruh gambar anda dan sedikit info blog anda di sidebar. Namun jangan banyak2 jika anda bukan membuat blog galleri fotografi. Nanti berat untuk di akses orang,jd sedikit pengunjung deh. ;)

Segitu dulu ya beberapa tips dan trick mempercantik tampilan wordpress anda. Selamat mencoba. :)

8 Plugins WordPress Untuk Mobile Website/Blog Edition

Bersahabat dengan Ponsel

8 Plugins WordPress Terbaik untuk Menjadikan Blog Anda Lebih Bersahabat dengan Ponsel

Sekarang ini sudah sangat umum untuk menemukan orang-orang browsing web menggunakan ponsel mereka.  Banyak ponsel membanjiri pasar dengan harga yang terjangkau dan tentunya membantu Anda untuk browsing internet dengan mudah.  Jadi, selalu berpikir bijaksana untuk membuat blog Anda lebih mudah diakses oleh mereka yang melihat blog Anda di handset mobile mereka.  Saya memiliki sejumlah plugin yang benar-benar membantu WordPress sehingga menyelamatkan kita dalam situasi seperti ini.  Di sini, saya telah mendaftarkan 8  plugin WordPress terbaik yang membantu Anda untuk membuat blog Anda lebih bersahabat dengan perangkat mobile.

# 1 – Mobile Admin

Mobile Admin menyesuaikan UI WordPress Admin untuk lebih mudah diakses ke perangkat mobile, khususnya ponsel.  iPhone / iPod Touch browser adalah target utama, tetapi browser ponsel lain juga didukung pada tingkat dasar, dan plugin ini dapat digunakan untuk menyesuaikan browser tertentu.

# 2 – WordPress Mobile Edition

WordPress Mobile Edition adalah plugin yang menunjukkan sebuah antarmuka yang dirancang untuk perangkat mobile ketika pengunjung datang ke situs Anda pada perangkat mobile.  Mobile browser secara otomatis terdeteksi, daftar mobile browser dapat dengan mudah disesuaikan pada halaman pengaturan.

# 3 – Mobilize

Setelah diinstal, apapun jenis ponsel yang mengakses URL Anda, akan diarahkan ke render Mippin blog Anda.  Mippin membuat sempurna untuk setiap tipe ponsel.  Bahkan iPhone membuat blog Anda lebih baik dan lebih cepat daripada pergi ke URL PC langsung.  Tampilan situs mobile yang diberikan dapat secara optional dikonfigurasi oleh pemilik situs blog dan dia dapat menambahkan iklan juga dan mendapatkan 100% dari pendapatan iklan seluler.  Layanan ini benar-benar gratis.

# 4 – WordPress Mobile Pack

WordPress Mobile Pack adalah toolkit yang lengkap untuk membantu memobilisasi situs WordPress dan blog Anda.  Ini termasuk mobile switcher untuk memilih tema berdasarkan jenis pengguna yang mengunjungi situs, pilihan tema mobile, widget ekstra, adaptasi perangkat dan sebuah panel administrasi mobile untuk memungkinkan pengguna untuk mengedit situs atau menulis posting baru.

# 5 – WordPress Mobile by Mobify

Mobify adalah layanan web yang memungkinkan untuk menyesuaikan setiap komponen lebih indah, mengadaptasi untuk lebih dari 5.000 perangkat.  Plugin ini mendeteksi perangkat mobile dan mengirimkannya ke URL mobile yang sesuai.  Anda harus mendaftar untuk meminta akun Mobify gratis di http://mobify.me untuk menciptakan dan mengelola versi mobile.

# 6 – MobilePress

MobilePress adalah plugin WordPress gratis yang mengubah blog WordPress menjadi lebih mudah bila dilihat pada ponsel.  MobilePress juga memungkinkan Anda untuk membuat tema mobile kustom untuk perangkat genggam yang berbeda dan browser mobile seperti iPhone, Opera Mini dan Windows Mobile.

# 7 – WPhone Plugin

Ini adalah plugin yang telah memenangkan penghargaan dan menciptakan pilihan halaman login untuk menggantikan antarmuka default admin yang dirancang untuk ponsel Anda.  Plugin ini untuk digunakan WordPress versi terbaru, tapi akan bekerja juga dengan versi 2.1 dan yang lebih baru.

# 8 – Wetomo WordPress to Mobile

Wetomo (Web to Mobile) adalah layanan yang memungkinkan penerbit untuk menampilkan konten web yang ada untuk pengguna pada ponsel dan perangkat genggam lainnya.  Plugin ini mendeteksi ketika pengguna sedang di ponsel dan secara otomatis diarahkan ke Wetomo, yang bertindak sebagai proxy antara ponsel dan situs WordPress dan menyesuaikan konten situs web dengan kemampuan ponsel.

Apakah Anda menginstal salah satu plugin di atas dalam blog WordPress Anda?  Berapa persentase jumlah pengunjung yang melihat blog Anda dengan menggunakan perangkat mobile?

Tutorial WordPress: Cara Memasukan Gambar Pada Artikel

WorldPress 3 Tutorial WordPress: Cara Memasukan Gambar Pada ArtikelTutorial kali ini mengenai bagaimana caranya memasukan gambar( image ) ke artikel anda, seperti yang anda lihat di kiri artikel saya ini. Sebelum saya menjelaskan bagaimana caranya memasukan gambar ke artikel, ada baiknya anda siapkan dulu gambarnya dan saya rekomendasikan gambar anda jangan lebih dari 200x200px apabila anda ingin memasang gambar tersebut di sebelah kiri atau kanan artikel.

Alasannya agar gambar dan tulisan anda akan terlihat seimbang dan rapi.Pilihlah gambar yang sesuai dengan artikel anda, tapi itu hanya optional saja karena tidak sedikit blogger juga menggunakan gambar-gambar yang tidak sesuai dengan artikel.Sekarang saya jelaskan step by step cara memasang gambar pada artikel :

1.Silahkan anda login ke wp-admin.

2.Lihat kiri anda, ada menu Posts klik pada tanda panah yang ada di sebelah kanan Posts agar memunculkan menu drop down.

3.Setelah itu anda klik Add New.

4.Setelah masuk ke halaman untuk membuat artikel anda cari kotak kecil tepat di sebelah tulisan Upload/Insert.Lihat gambar di bawah ini.

gambar Tutorial WordPress: Cara Memasukan Gambar Pada Artikel

5.Klik pada kotak kecil tersebut.Lalu akan muncul gambar berikut.

gambar2 Tutorial WordPress: Cara Memasukan Gambar Pada Artikel6.Klik pada Select Files.Kemudian anda tinggal pilih gambar yang akan di pasang pada artikel anda.

WordPress: Expand Your Text Editor

WordPress is by far the most popular blogging platform. It is easy to use and infinitely customizable.

One of my favorite features of WordPress is the “advanced” version of the text editor used to write posts. For some reason this option isn’t enabled by default nor is there a box in any of the options to make it appear. You have to know the “code”.

So what is the code? Ctrl + Alt + V Just press that key combination when you are in the “Write” section of your wordpress blog. It should look like this:

Advanced Text Editor

It makes it very easy to write the word green in green, red in red; insert special characters like © or ™ or even ®. You can also paste text from a word formatted document, change the heading type (H1, H2, paragraph, etc.), clean up messy code, undo, and underline.

If you are still need more control over your posts, take it to the next level. Supercharge your text editor by downloading the Advanced TinyMCE Editor. The installation procedure is only slightly more complex than a normal plug-in but the end result is this:

Advanced TinyMCE Editor

Now you can do it all with 60+ options including: superscript, subscript, emoticons, media (Flash, Shockwave), tables and SO much more. Tip: Be sure to read the readme.txt in the extracted folder.

Go crazy and get the upgrade to the ultimate WordPress text editor.


WP PostViews – Plugin untuk Melihat/Menampilkan Pengunjung Blog

ordpress self host kita.

Jika temen-temen mengamati halaman home blog tersebut, attribute title blog yang berada dibawah Judul tiap posting berupa dua buah kotak. Kotak pertama berwarna abu-abu berisi jumlah komentar dan tanggal dipublikasikannya posting tersebut yang dipisahkan tanda “/” (garis miring). Pada kotak kedua berisi author/penulisnya.

Namun jika kita masuk ke halaman single post, attributnya bertambah satu lagi yaitu Views. Views disini adalah jumlah pengunjung yang sudah membuka halaman posting tersebut. Ada juga yang menyebutnya dengan hit counter. Contohnya saat saya membuka posting terakhirnya muncul 201 Views seperti pada gambar dibawah.

New Picture 112 WP PostViews – Plugin untuk Melihat/Menampilkan Jumlah Pengunjung Tiap Posting BlogWP PostViews

Fungsi dari pemasangan atribut tersebut selain memperkaya informasi suatu blog bisa juga untuk memonitor tulisan apa yang banyak dicari di blog kita. Sehingga tulisan kita selanjutnya bisa lebih terarah apa yang akan ditulis. Selain itu jika blog sudah mempunyai traffic yang LUMAYAN, bisa untuk pamer tuh. Segini lho jumlah pengunjung tiap posting blogku ini, wkwkwkwk…

Setelah browsing kesana-kemari ternyata susah juga mencari tutorial yang membahas ini.

Pada Blogger/Blogspot

Untuk temen-temen yang menggunakan blogger/blogspot sebagai platform blognya, cara untuk menampilkan jumlah pengunjung pada tiap posting blog dapat dilakukan secara manual, bekerja sama dengan pihak ketiga yaitu FreeBlogHitCounter.  Meskipun bisa dilakukan tanpa registrasi namun cara ini menurut saya terlalu ribet harus menyisipkan kode ditiap postingnya. Padahal setiap kode hanya untuk satu link posting kita. Lha kalau posting blog kita sudah lebih dari 500, busyeet dah…

Jika ingin melihat demonya sekalian tutorialnya bisa dilihat di indo-template-blogger.blogspot.com.  Penghitung jumlah pembaca posting blog terletak dibawah entry tulisan blog tersebut.

Pada WodrPress Self Host

Buat kita yang menggunakan wordpress self host seperti halnya juga bro Satrya, kita bisa memanfaatkan plugin Top10 dan WP-PostViews. Kedua plugin ini mempunyai fitur untuk bisa dipasang pada sidebar.

Pada instalasi plugin Top 10,  saya hanya bisa menampilkan informasi “Visited 1 times, 1 visits today“) di bawah entry tulisan. Tapi bukan seperti itu yang saya inginkan. Saya ingin seperti yang ditampikan pada blog bro Satrya diatas tadi. Meskipun plugin ini banyak sekali fiturnya tapi saya masih tetep binggung menggunakannya.

Akhirnya ketemu plugin yang cocok yaitu WP-PostViews. Versi terakhir blog ini adalah versi 1.50 namun terjadi eror saat diinstal. Jadi saar ini saya menggunakan yang versi 1.40. Sebelumnya saya sempat ragu juga untuk mencoba plugin ini karena pada Changelog terdapat fitur yang mengatakan seperti ini :

Version 1.50 (01-06-2009)

  • NEW: Works For WordPress 2.8 Only

Version 1.40 (12-12-2008)

  • NEW: Works For WordPress 2.7 Only

Namun akhirnya berhasil juga menggunakan versi 1.40 ini.

Cara Memasang

  1. Download plugin WP-PostViews 1.40
  2. Install ke wp-content/plugins kemudian aktifkan
  3. Buka Single.php dan cari kode berikut : <?php while (have_posts()) : the_post(); ?>
  4. Tambahkan kode berikut sesuai dengan keinginan teman-teman asalkan dibawah kode nomor 3 diatas. <?php if(function_exists(‘the_views’)) { the_views(); } ?>
  5. Update Files
  6. Untuk pengaturan lainnya silahkan masuk ke Setting > PostViews.

Uninstall WP-PostViews

Deactivating WP-PostViews plugin does not remove any data that may have been created, such as the views data. To completely remove this plugin, you can uninstall it here.WARNING:Once uninstalled, this cannot be undone. You should use a Database Backup plugin of WordPress to back up all the data first. The following WordPress Options/PostMetas will be DELETED:

Jadi, sebaiknya tidak usah di uninstall daripada ada sesuatu yang hilang nantinya, hehe…

Menghemat energi saat blogging : pluggin onlineleaf

screenshot 3 Menghemat energi saat blogging : pluggin onlineleaf Saat ini pemerintah memang sedang menggalakkan program hemat energi, mulai dari program 19-22, yaitu untuk menghemat pemakaian listrik pada pukul 19.00 sampai 22.00, bike to work untuk mengurangi penggunaan bahan bakar minyak, dan konversi minyak tanah ke gas. Tapi taukah teman-teman, ternyata sebagai blogger kita  juga bisa menghemat energi.
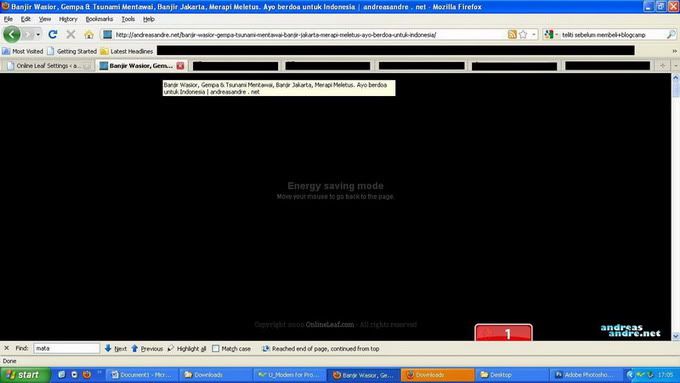
Bagaimana caranya ?

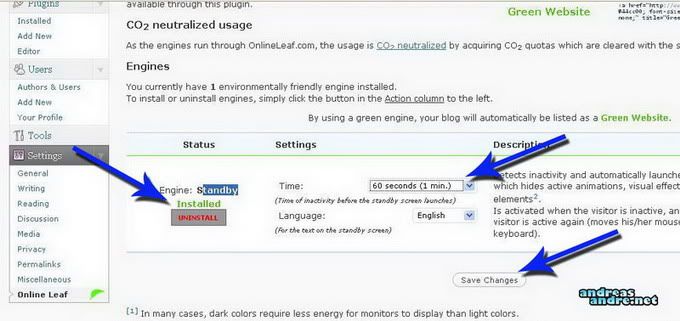
Walaupun sedikit, kita tetap bisa membantu penghematan energi dengan menghentikan kegiatan blogging kita cara memasang plugin online leaf. Jika ingin mencoba plugin ini bisa di download di sini dan jika penasaran, silahkan mengunjungi blog saya untuk melihat demo dari plugin ini icon biggrin Menghemat energi saat blogging : pluggin onlineleaf . Cara mengingstal plugin ini sama seperti plugin lainnya, kita hanya perlu masuk ke Dashboard -> Plugins -> add new -> instal dan aktifkan plugin. oya, pastikan plugin sudah dalam keaadaan terinstal (installed)

settingonlineleaf 1 Menghemat energi saat blogging : pluggin onlineleaf

Jika plugin sudah benar-benar aktif, maka tampilan akan seperti ini:

hasil 1 Menghemat energi saat blogging : pluggin onlineleaf

Kenapa bisa menghemat energi?

Plugin ini nantinya akan menampilkan berwarna hitam yang akan menutupi layar dan semua animasi pada blog kita. Prinsip kerjanya sama seperti screen saver pada desktop. Namun bedanya, plugin ini akan menampilkan screen saver pada browser di blog kita. Alasan kenapa kita bisa menghemat energi dengan plugin ini :

  • Pada kasus ini, penggunaan warna gelap pada komputer lebih membutuhkan sedikit energi daripada menampilkan warna yang terang.
  • Dengan menyembunyikan elemen animasi, seperti flash atau lainnya, maka akan membantu mengurangi kinerja hardware dalam menggenerate website.

Semoga cara ini bisa membantu melakukan penghematan energi.

5 Tools Online Untuk Mengecek Backlink

increase backlinks 300x2561 5 Tools Online Untuk Mengecek BacklinkUntuk mendapatkan posisi yang bagus di Search Engine tentu saja blog anda harus mempunyai backlink dan link popularity yang banyak.Seperti yang sudah saja jelaskan mengenai backlink dan apa saja manfaatnya pada artikel 100 backlink gratis, sudah jelas anda akan sangat membutukan backlink yang banyak untuk memperbaiki posisi blog di Search engine.

Mungkin anda juga ingin tahu berapa banyak backlink yang sudah anda dapat selama ini, oia backlink pun sangat berpengaruh dalam peningkatan Pagerank, semakin tinggi Pagerank semakin berkualitas blog anda di mata Search Engine.

Berikut 5 tools online yang bisa anda gunakan untuk mengecek berapa banyak backlink yang blog anda dapatkan.

  1. Backlinkwatch.com
  2. Analyze Backlinks
  3. Link Appeal
  4. Popuri.us
  5. seopro.com.au
© 2011 Blog Bilcyber.com. All rights reserved.
Proudly designed by Theme Junkie.