Blog Bilcyber.com - Part 7

Cara Mudah Menampilkan Emoticon Tambahan Update Status Facebook

Berikut ini caranya:
1. Login ke akun facebook
2. Klik aplikasi facadedd
3. Disana akan ada peringatan tentang “Request for permission” gak usah bingung, klik saja Allow
4. Terakhir,  tulis status anda melalui aplikasi tersebut. Untuk menampilkan emotion klik saja gambar yang diinginkan sebagai emotion.

Mudah bukan ??

Tips Mudah Cara Membuat Iklan Melayang pada WordPress

Cara membuat iklan melayang dengan java script pada wordpress kali ini merupakan jawaban dari pertanyaan guru olahraga yang bingung menerapkan teknik cara membuat iklan melayang dengan tombol close sebelumnya. Sebenarnya code script nya sama saja, tapi di teknik sebelumnya hanya saya fokuskan pada Blogspot, lalu bagaimana caraanya untuk ditempatkan pada WordPress ??

Oke kita flash back dulu ke teknik cara membuat iklan melayang dengan tombol close sebelumnya, copas saja codenya lalu terserah anda mau menempatkan iklan itu dimana. Apakah mau di tempatkan di Main Index (home) , atau di Single Post (di artikel). Atau ke dua-duanya :mrgreen: .

Ini dia code / script yang nantinya Anda gunakan sebagai pemanggil

<style type=”text/css”>
#gb{
position:fixed;
top:10px;
z-index:+1000;
}
* html #gb{position:relative;}

.gbcontent{
float:right;
border:2px solid #A5BD51;
background:#ffffff;
padding:10px;
}
</style>

<script type=”text/javascript”>
function showHideGB(){
var gb = document.getElementById(“gb”);
var w = gb.offsetWidth;
gb.opened ? moveGB(0, 30-w) : moveGB(20-w, 0);
gb.opened = !gb.opened;
}
function moveGB(x0, xf){
var gb = document.getElementById(“gb”);
var dx = Math.abs(x0-xf) > 10 ? 5 : 1;
var dir = xf>x0 ? 1 : -1;
var x = x0 + dx * dir;
gb.style.top = x.toString() + “px”;
if(x0!=xf){setTimeout(“moveGB(“+x+”, “+xf+”)”, 10);}
}
</script>

<div id=”gb”>

<div onclick=”showHideGB()”> </div>

<div>

<div style=”text-align:right”>
<a href=”javascript:showHideGB()”>
.:[Close][Klik 2x]:.
</a>
</div>
<center>

DISINILAH ANDA MELETAKAN KODE SCRIPT IKLAN ANDA

</center>

<script type=”text/javascript”>
var gb = document.getElementById(“gb”);
gb.style.center = (30-gb.offsetWidth).toString() + “px”;
</script></center></div></div>

Tempatkan code diatas setelah code <?php get_header(); ?> , selamat mencoba

Auto ReadMore Dengan Thumbnail Pada WordPress

Akhirnya setelah mencoba berkali-kali script maupun code php untuk membuat auto readmore di blog wordpress, yang awalnya code dari mas deny. Kini saya telah mendapat dan mencoba code php untuk membuat tampilan Auto Readmore versi terbaru dengan gambar Thumbnail .

Kemarin saya udah posting Auto Readmore di Blogspot Banyak yang menanyakan bagimana cara membuat auto readmore dengan thumbnail, tetapi baru kemarin saya mendapat caranya.

Masuk ke dashboard wordpress

Klik Appearence lalu silahkan masuk ke menu editor.

Setelah itu Anda masuk ke functions.php tambakan code berikut :

<?php
// retreives image from the post
function getImage($num) {
global $more;
$more = 1;
$content = get_the_content();
$count = substr_count($content, ‘<img’);
$start = 0;
for($i=1;$i<=$count;$i++) {
$imgBeg = strpos($content, ‘<img’, $start);
$post = substr($content, $imgBeg);
$imgEnd = strpos($post, ‘>’);
$postOutput = substr($post, 0, $imgEnd+1);
$image[$i] = $postOutput;
$start=$imgEnd+1;

$cleanF = strpos($image[$num],’src=”‘)+5;
$cleanB = strpos($image[$num],’”‘,$cleanF)-$cleanF;
$imgThumb = substr($image[$num],$cleanF,$cleanB);

}
if(stristr($image[$num],’<img’)) { echo $imgThumb; }
$more = 0;
}
//retreive image ends
?>

Script ini berguna untuk memanggil url gambar yang terdapat di dalam postingan. lalau tekan Update File untuk menyimpan code tersebut..

Masuk ke index.php, dan cari kode The _content kemudian paste kode ini di atasnya..

<div>

<a href=”<?php the_permalink(); ?>” title=”<?php the_title_attribute(); ?>”>

<img src=”<?php getImage(’1′); ?>” height=”150″ width=”150″>

</a>

</div>

Lalu Update File untuk menyimpan.. Selanjutnya gimana lagi ??.. tenang  tinggal satu langkah lagi yaitu Anda masuk ke intinya, agar tampilan Auto Readmore dengan Thumbnail terlihat menarik tentunya Anda harus mengedit Style.CSS . Tambahkan code dibawah ini di style.css

.thumbnail a:link, .thumbnail a:visited {display:block; float:left; padding:5px; background:#e2e2e2; width:150px; height:150px;
margin:5px 5px 0 0;}

.thumbnail a:hover, .thumbnail a:active {background:#C4C4C4;}

Tekan Update File.. dan silahkan lihat hasilnya..

Cara Mudah Mengganti Author Name di Blogspot

Author name, adalah nama pembuat artikel/penulis artikel dalam blog dan merupakan bawaan default dari blogger. Terkadang kita membuat banyak blog dalam satu akun blogger dan kita ingin mengganti author name disetiap blog kita yang telah kita buat tapi ternyata setelah satu blog kita ganti authornya, semua blog ikut di author name ikut keganti.

Ada satu cara simple sebenarnya untuk mengakali bagaimana Mengganti Author Name di Blogspot, yang bisa kita rubah sesuai dengan keinginan kita dan berbeda-beda disetiap blog dalam satu akun blogger. Mau tau caranya ?

1. Login ke blogger
2. Pada menu Design -> Edit HTML
3. Beri tanda centang pada “Expand Widget Templates”
4. Cari kode dibawah ini

<b:if cond='data:top.showAuthor'>
<data:top.authorLabel/> <data:post.author/>
</b:if>

Lihat code yang saya beri warna merah, itulah code pemanggil author dalam blogspot. Jika anda mengganti author name dalam satu akun blogger, maka semua author dalam blog Anda akan ikut ganti secara otomatis. Nah Anda bisa mengakali nya dengan cara menggati  <data:post.author/> dengan kata-kata atau nama sesuka Anda. Misal

<b:if cond='data:top.showAuthor'>
<data:top.authorLabel/> Pengangguran Sukses
</b:if>

Author telah saya ganti dengan kata Penganguran Sukses, dan maka author di salah satu blog saya menjadi pengangguran sukses :mrgreen:

5. Kalau sudah klik Save Template, dan lihat hasilnya..

Tambahan Plugins WordPress Untuk Adsense

Plugins WordPress Untuk Adsense

1. AdSense Manager
Download : http://wordpress.org/extend/plugins/adsense-manager/
Plugin Adsense ini berfungsi untuk memanage Iklan Google Adsense di wordpress anda.

2. AdRotator WordPress Plugin
Download : http://blog.taragana.com/wp-content/upload/adrotator.zip
Plugin Adsense ini berfungsi untuk menampilkan program adsense seperti google AdSense, Clicksor, Chitika secara bergantian.

3. Adsense Earnings
Download : http://adsense-wordpress-plugin.ayanev.com/wp-content/uploads/2006/08/adsense-earnings.zip
Plugin Adsense ini berfungsi untuk menampilkan income Google Adsense anda di dashboard WordPress.

4. Adsense Deluxe
Download : http://software.acmetech.com/wordpress/plugins/adsense-deluxe_wp_plugin.zip
Plugin ini menawarkan pilihan untuk mengatur penempatan iklan Google Adsense atau Yahoo Publisher Network pada wordpress anda.

5. Adsense Injection
Download : http://www.biggnuts.com/adsense-plugin/
Adsense Injection adalah plugin untuk WordPress yang memungkinkan Anda untuk memasukkan kode adsense secara acak dalam berbagai tempat di blog Anda.

6. Adsense Inline
Download : http://philhord.com/wp-hacks/adsense.zip
Plugin yang berfungsi untuk menampilkan iklan Google Adsense di dalam Posting.

7. Shylock Adsense
Download : http://shylockblogging.com/shylock-adsense-plugin
Plugin ini berfungsi untuk memasukan Iklan Google Adsense kedalam blog tanpa harus memodifikasi template.
Keunggulan Shylock adsense adalah kemampuannya untuk memilah-milah tempat dimana kita hendak menampilkan kode adsense kita.

8. AdSense Widget
Download : http://wordpress.smullindesign.com/plugins/google-adsense-widget
Plugin Google Adsense ini berfungsi menyediakan Widget Google Adsense untuk blog WordPress anda.

9. Google Ad Wrap
Download : http://wordpress.org/extend/plugins/google-ad-wrap/
Plugin Google Adsense ini berfungsi untuk penargetan iklan yang lebih baik.

10. AdSense Sharing Revenue and Earnings System
Download : http://adsense.ayanev.com/adsense-sharings.rar
Plugin Adsense ini berfungsi untuk melihat pendapatan adsense anda dan memperlihatkan impresi adsense anda kepada teman dan co-authors diblog.

11. All in One Adsense and YPN
Download : http://wordpress.org/extend/plugins/all-in-one-adsense-and-ypn/
Plugin yang dapat secara otomatis menyisipkan iklan google adsense atau yahoo publisher network ke dalam posting Anda dengan cepat.

12. AdSense Integrator
Download : http://wordpress.org/extend/plugins/adsense-integrator/
Plugin ini dikembangkan untuk menyisipkan dan mengelola iklan AdSense, berdasarkan peraturan terakhir Google dan adSense update.

Tips Google Adsense

Tips pertama :

Format Ads

Pilih format yang sesuai . Anda boleh pilih banner , skysrappers , squares , link dan sebagainya . Anda boleh meletakkan adsense lebih dari 3 iklan dalm 1 page/halaman tetapi saran saya jangan terlalu banyak karena jika tidak ada yang klik juga percuma , yakan ?

Tips kedua :

Pastikan ads tidak seperti kelihatan ads

Maksud saya orang mencari informasi di internet bukan untuk mengklik iklan ads . Jadi kesimpulannya biarkan bentuk ads secara by : default . Contohnnya liat saja blog semua bisnis saya ini .

Tips ketiga :

Gunakan task ads dan search for content

Rata – rata orang mengunakan kedua ini mereka sangat jarang menggunakan banner . Lihat saja anda sendiri anda pasti jarangkan mengklik banner , ebnar gak hehe ….

Tips keempat :

Cara menaruh ads

Cara menaruh ads itu sangat penting didalam blog anda , jangan menaruh ads yang tidak terlihat orang , karena nantinya anda sendiri yang akan rugi .

Tips kelima :

Jangan pakai border

Seperti tips no.2 biarkan ads secara default .

Tips keenam :

Warna task

Pastikan warna task ads anda sama seperti warna tulisan blog anda .

Tips ketujuh :

Kurangi ads

Jangan terlalu banyak menaruh ads diblog anda karena kalau anda menaruh terlalu banyak juga percuma karena nilai iklan ads yang keluar ada yang bernilai rendah .

Tips kedelapan :

Anda boleh selang selingkan ads seperti blog saya .

Tips kesembilan :

Sertakan google search box

Strategi ini adalah misalnya ada orang yang mencari informasi diblog anda dan mereka masih belum puas dengan informasinya sedangkan informasi yang mereka cari tidak ada diblog anda , Pertannyaan saya apa yang akan mereka lakukan ? Pasti mereka menggunakan google search untuk mengetahui lebih dalam . Saya beri contoh : “ Can’t Find what you’re looking for ? Try google search . Atau masih belum puas mencari informasi silah kan gunakan google search ? Dorong orang agar mengunakan google search itu ?

Tips kesepuluh :

Jangan menggunakan keyword spam .

Misalnya anda mencari informasi di search engine tentang buku . kemudian ada link mengenai buku , begitu anda buka link tersebut tau – tau link tersebut tentang film ? Kesal tidak anda , pasti anda kesal saya saja kesal karena orang merasa dibohongi ?

Tips kesebelas :

keyword anda

Pastikan keyword anda bernilai tinggi atau biasa disebut High Paying keyword , untuk lebih jelasnya cari informasi di google dan pelajari sedikit demi sedikit .

Tips keduabelas :

Gunakan channel

Untuk yang 1 ini kalau anda di terima google team ada harus log in dulu di google adsense .

Tips ketigabelas :

Promosi

Bagian ini sangatlah penting , darimana orang melihat blog anda kalau bukan promosi , betul gak hehehe…. Saran saya promosi di forum , komunitas blog dunia , dan tukar link sesama pemain google ads atau para blogger mania dll .

Tips terakhir :

Belajar

WordPress Global Translator Plugin

Global Translator is a free and open source WordPress Plugin which is able to automatically translate your blog in 48 different languages:
Italian, Korean, Chinese (Simplified & Traditional), Portuguese, English, German, French, Spanish, Japanese, Arabic, Russian, Greek, Dutch, Bulgarian, Czech, Croatian, Danish, Finnish, Hindi, Polish, Romanian, Swedish, Norwegian, Catalan, Filipino, Hebrew, Indonesian, Latvian, Lithuanian, Serbian, Slovak, Slovenian, Ukrainian, Vietnamese, Albanian, Estonian, Galician, Maltese, Thai, Turkish, Hungarian, Belarus,Irish, Icelandic, Macedonian, Malay, Persian.
The number of available translations will depend on your blog language and the translation engine you will chose to use.
The most powerful features which Global Translator provides are:

  • Four different Translation Engines: it has the ability to provide the translations by using Google Translation Engine, Babel Fish, Promt, FreeTranslations.com
  • Search Engine Optimized: it uses the permalinks by adding the language code at the beginning of all your URI. For example the english version on www.domain.com/mycategory/mypost will be automatically transformed in www.domain.com/en/mycategory/mypost
  • Fast Caching System: new fast, smart, optimized, self-cleaning and built-in caching system. Drastically reduction of the risk of temporarily ban from translation engines.
  • Fully configurable layout: you can easily customize the appearance of the translation bar by choosing between a TABLE, DIV or IMAGE MAP based layout for the flags bar and by selecting the number of translations to make available to your visitors
  • No database modifications: Global Translator is not intrusive. It doesn’t create or alter any table on your database: this feature permits to obtain better performances.

If to want to have the latest news and updates delivered directly to you, to stay up to date you could decide to subscribe to my latest post or to my comments. You could also evaluate to receive the updates by email: see at the “SUBSCRIPTION” section on the sidebar.

IMPORTANT: I daily receive about 30/40 comments and messages containing suggestions or support requests about Global Translator. Unfortunately I can’t offer free support anymore because it requires a lot of time and costs a lot. If you need help or need more advanced features, I suggest you to buy Global Translator PRO.

Download
Latest version (20th of Mar, 2010): global-translator.1.3.1.zip

Need support or advanced features? Take a look at Global Translator PRO!

I’ve spent a lot of time writing this code and supporting it.
If you derive some benefit from this code, please consider showing your gratitude in a more tangible way. Thanks!

pixel

Previous versions
20th of Aug, 2009: global-translator.1.2.6.zip
21th of April, 2009: global-translator.1.2.3.zip
4th of April, 2009: global-translator.1.2.2.1.zip
3rd of March, 2009: global-translator.1.2.1.zip
29th of January, 2009: global-translator.1.2.zip
27th of December, 2008: global-translator.1.1.2.zip
6th of December, 2008: global-translator.1.0.9.2.zip
15th of November, 2008global-translator.1.0.9.1.zip
4th of November, 2008:global-translator-1.0.8.1.zip
21th of October, 2008:global-translator-1.0.7.1.zip
4th of September, 2008:global-translator-1.0.6.zip
27th of August, 2008:global-translator-1.0.5.zip
22th of August, 2008: global-translator-1.0.4.zip
20th of August, 2008: global-translator-1.0.3.zip
17th of August, 2008: global-translator-1.0.2.zip
21th of July, 2008: global-translator-0.9.1.zip
10th of May, 2008: global-translator-0.9.zip
13th of Apr, 2008: global-translator-0.8.zip
2nd of Feb, 2008: global-translator-0.7.1.zip
28th of Jan, 2007: global-translator-0.7.zip
31th of Aug, 2007: global-translator-0.6.2.zip
17th of Apr, 2007: global-translator-0.6.zip
23th of Dec, 2006: global-translator-0.5.zip
09th of Dec, 2006:global-translator-0.4.1.zip
27th of Nov, 2006:global-translator-0.2.zip
20th of Aug, 2006:global-translator-0.1.zip

Requirements

Global Translator has been tested on WordPress 2.3.*, 2.5, 2.6, 2.7, 2.8 and 2.9.

Installation

  • Upload the folder “global-translator” into your “wp-content/plugins”
  • Log in to WordPress Administration area, choose “Plugins” from the main menu, find “Global Translator”, and click the “Activate” button
  • Choose “Options->Global Translator” from the main menu and select
    your blog language and your preferred configuration options then select “Update Options“.

Upgrading

  • Uninstall and remove the previous version and follow the Installation instructions, but if you’re upgrading from 0.9 or higher version I suggest you to preserve the “cache” directory.

Configuration

  • If your theme is widged-enabled, just choose “Presentation->Widgets” from the administration main menu
    and drag the “Global translator” widget on the preferred position on your sidebar.
    If your theme is not widgetized, just add the following php code (usually to the sidebar.php file):

    <?php
    if(function_exists("gltr_build_flags_bar")) {
    gltr_build_flags_bar();
    }
    ?>

    After this simple operation, a bar containing the flags which represents all the available translations for your language will appear on your blog. Check my blog for an example (on the sidebar) or take a look to my Youtube Video Downloaders blog.

Uninstallation

  • Log in to WordPress Administration area, choose “Plugins” from the main menu, find the name of the plugin “Global Translator”, and click the “Deactivate” button

Bug submission

  • Bug submission is an important aspect of many Open Source projects, and submitting bugs correctly increases the chances of the developer finding and fixing any problems that may arise.
    If you want to submit bug issues, please use the Contact form and remember to specify the following informations:
    - the version of the plugin you’re using
    - a full description of the problem (and the error message if available)
    Please don’t submit bugs or support requests as comments otherwise the discussion threads risk to become confusing.
    Alternatively you can also start a new topic here.

5 Best Choices for WordPress Forum Plugins

What if you want a forum on your blog? Well there are plenty of open source forum systems available. But what about integrating your blog cms with your new forum? There are some effective WordPress plugins to help you accomplish this. But choosing the right one is critical. There are many plugins to help you accomplish this, but I found 5 that actually do what they say they do!

1. bbPress – Far & Away The BEST Option

http://bbpress.org/
Pound for pound bbPress is your best option for integrating a full fledged forum into your blog. bbPress has a very simple interface which makes it very popular amongst it’s users. The templates are easy to customize. In fact they are just as easy to customize as WordPress templates. And the plugin actually integrates the forum database with your WordPress database, that way the integration is seamless.

2. Forum Server

http://wordpress.org/extend/plugins/forum-server/
Forum Server is a plugin for WordPress that is a more advanced and up-to-date plugin of the original WP-Forum plugin. It will integrate with your WordPress Users database table so that users who are registered with your blog will also be registered with the forum. The plugin is a little bit more complex to use than bbPress, but you will find a few different characteristics of this forum that you might like and choose over bbPress.

3. Simple: Press Forum

http://simplepressforum.com/
If you like lots of icons in your forums than you will enjoy this plugin. Again this one is not as easy to use as bbPress. But for those who are accustomed to more traditional looking and functioning forums than this will be a great choice for you. This plugin can too integrate with WordPress user registrations and logins. This forum appears to have the most overall features than any of the other WordPress forum plugins. If it is a more advanced forum you are after, then go with Press Forum.

4. phpBB Recent Topics

http://wordpress.org/extend/plugins/phpbb-recent-topics/
There may be a situation where it’s best to install your forum with an open source application, separate from the blog entirely. phpBB is by far the most popular and notable of the open source forum apps. This plugin for WordPress called phpBB Recent Topics will allow you to include in your blog (anywhere of your choice) a list of the most recent threads or topics from your phpBB forum! This is the quickest and least painful way of integrating a forum with your blog.

5. Wp2BB

http://wordpress.org/extend/plugins/wp2bb/
Wp2BB provides another way for you to integrate your phpBB forum with your WordPress blog. What this plugin does is that it automatically creates new topics in your phpBB forum for every new post that you write in your WordPress blog. It can also coexist with the WordPress comments system or replace it completely. In a nutshell this plugin would increase the conversation in your forum rather than where normally takes place in your blog posts comment threads.

Google AdSense Modules for Joomla

Google AdSense is the Premier provider of contextual advertisements enabling all webmasters to generate revenue from their sites. If you haven’t already done so, signup for AdSense.

Google AdSense Clicksafe Module from Joomlaspan has been the most popular option to implement These contextual advertisements within Joomla! It is used on thousands of Joomla! based websites and is also the Editor’s Pick at the official Joomla! Extensions Directory!

Now also for Joomla! 1.5!

The updated version 3.0 has been rewritten completely, and this module brings more options than ever.

  1. 100% compatible with Google AdSense Policy
  2. 100% configurable
  3. XHTML compliant
  4. All options available with Google AdSense are available with this module
    • All ad formats, including the recently introduced 200×200 square
    • Round corners are also possible now
    • Both content ads and adlinks are available in the same module
  5. Chameleon codes are also available as an option. Using this, you can select colors for ad units that change with each pageload (Only with ClickSafe Version).
  6. Advanced feature (optional): You can select to block certain IP numbers from seeing Google AdSense ads on your site – the ClickSafe feature (Only with ClickSafe Version).
  7. You can have as many  copies on your site as you want, just keep the Google policies in mind:
    • Up to three ad units may be displayed on each page
    • Up to three link units may also be placed on each page

Download the modules:

for Joomla 1.0.x Download for Joomla 1.5!

Installation

Installation (Joomla 1.0.x)

Installing this module is very easy. It is basically done as you would install any Joomla module.

First of all, please download the latest version from the downloads page. Save it on your computer at a convenient location, may be your desktop.

  1. Go to the admin backend of your Joomla! website and login.
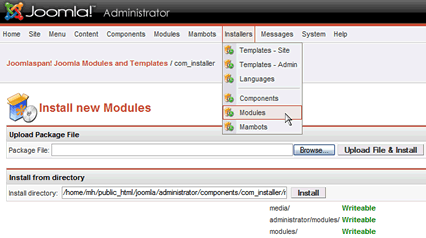
  2. Click on Installers > Modules in the top menu bar (see picture below).
  3. Click on Browse…, select the Google AdSense Module that you saved on your computer.
  4. Click on Upload File & Install.
  5. If nothing is wrong with your setup/ installation file, your module will be installed!
  6. Now, the time is to configure it for your use :)
  7. Click on Modules > Site Modules and look for the module just installed. Generally it is installed as the last item in the “left” module position. You may also use the dropdown filters available on that page.
  8. Open the module (labeled as “Sponsored Links” by default) and modify the configuration parameters as necessary.

How to install a module in Joomla

Installation (Joomla 1.5.x)

Installing this module in Joomla 1.5 is even easier. It is done as you would install any Joomla extension.

First of all, please download the latest version from the downloads page. Save it on your computer at a convenient location, may be your desktop.

  1. Go to the admin backend of your Joomla! 1.5 website and login.
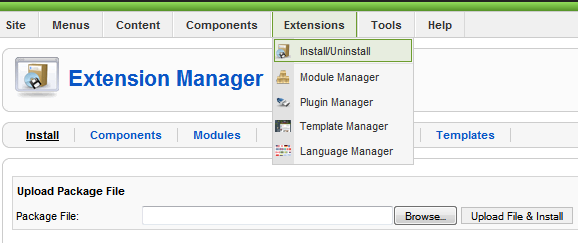
  2. Click on Extensions > Install/Uninstall in the top menu bar (see picture below).
  3. Click on Browse…, select the Google AdSense Module that you saved on your computer.
  4. Click on Upload File & Install.
  5. If nothing is wrong with your setup/ installation file, your module will be installed! Isn’t it easy?
  6. Now, the time is to configure it for your use :)
  7. Click on Extensions > Module Manager and look for the module just installed. Generally it is installed as the last item in the “left” module position. You may also use the dropdown filters available on that page.
  8. Open the module (labeled as “Sponsored Links” by default) and modify the configuration parameters as necessary.

How to install modules and other extensions in Joomla! 1.5

How to Make More Copies of this module

You may not be satisfied with only one ad block on your site, right? You will probably want to add more. Here’s how:

Do not try to install it repeatedly as that is not possible and not necessary.  Open the list of all modules in your Joomla admin backend (“Modules > Site Modules” in Joomla 1.0 and “Extensions > Module Manager” in Joomla 1.5). Check the box to the left of the JoomlaspanAdSense module, titled as “Sponsored Links”. Then go to the top of the page and click on the ‘Copy’ button on the right top. A copy of the module will be created and placed under the previous. It will read ‘Copy of…’.

Now open that and change the parameters. All parameters can be configured afresh, including the position and size of ads.

You can make as many copies as you want, but please remember that only three Google AdSense ad units and three link units are allowed per page.

Sumber : joomlaspan.com

Facebook Auto Like status and comment

Auto like status atau facebook auto like adalah cara otomatis like / suka terhadap status teman di facebook. Trik cara otomatis like / suka status facebook teman anda  juga berlaku untuk otomatis  like / suka komentar facebook teman anda. Facebook auto like / suka status dan comment teman berkat bantuan addons mozilla firefox Greasemonkey. Add-ons Greasemonkey ini canggih juga banyak kegunaannya selain untuk facebook.

Memang caranya mudah otomatis like / suka status facebook teman anda tapi jangan usil nanti temanmu malah sebel karena banyaknya pemberitahuan di facebook mereka. Terus gimana sich caranya untuk menggunakkan facebook auto like status itu? Nah ini pasti yang kamu inginkan ya. Oke kita mulai langkah bagaimana cara otomatis like / suka status dan komentar facebook teman anda ini.

Perhatikan sebelum menggunakan auto like facebook :

  1. Jangan sering sering menggunakannya nanti anda kena roadblock
  2. Jangan asal menggunakanya nanti kamu di musuhi sama teman anda
  3. Aplikasi atau add-ons Greasemonkey hanya berlaku untuk browser mozilla firefox karena itu yang di ujicoba disini.
  4. Add-ons Greasemonkey hanya berlaku di komputer/pc  anda dan tidak berlaku pada PC atau laptop teman anda jika tidak menginstall Greasemonkey.
  5. Saya tidak menyediakan screenshot jadi praktekkanlah jika ingin melihatnya.
  6. Terakhir gunakanlah dengan bijak ya.

Sebelum memulai proses installasi auto like status facebook sebaiknya koneksikan PC atau laptop anda ke internet dan Siapkan kemampuan anda, kalo tidak bisa suruh teman anda untuk membantu.

Langkah langkah penggunaan facebook auto like status and comment :

  1. Install mozilla firefox jika belum terinstall  >>> download mozilla firefox
  2. Install add-ons Greasemonkey  >>> Install Greasemonkey
  3. Install facebook auto like >>> install auto like

jika proses diatas anda ikuti dengan benar maka anda sudah bisa melakukan otomatis like / suka pada status dan komentar teman anda di facebook. Selamat mencoba.

© 2011 Blog Bilcyber.com. All rights reserved.
Proudly designed by Theme Junkie.